How to install and run WordPress using XAMPP on Windows?
The easiest way to run PHP or PHP-based CMS such as WordPress, Joomla, Drupal and many others CMS on Windows is to install the XAMPP package. The XAMPP package comes with Apache Web Server, MySQL database and PHP. XAMPP is installed by default at "C:/XAMPP" and the website files are hosted under "C:\xampp\htdocs\" directory.
WordPress is a popular blogging platform used my many bloggers on the internet. Whether you want to test WordPress for development or any other CMS, XAMPP is a very handy tool to have.
How to install and run WordPress using XAMPP on Windows?
Pre-requisites:
- Download - XAMPP.
- Install XAMPP
Refer previous post for step by step tutorial “How to install XAMPP on Windows?" - Download latest WordPress. (Download WordPress)
STEPS TO INSTALL WORDPRESS ON XAMPP
- After you have XAMPP installed, open XAMPP control panel.
Make sure Apache and MySql is running. If Apache and MySQL services are not running, click on “Start” button next to Apache and MySQL from the XAMPP Control Panel.
- Open http://localhost/. This will open an Apache page.
Note: IIS and XAMPP on the same computer?
If you have IIS installed on the same computer, then XAMPP Apache will not be accessible by using “http://localhost” due to HTTP port 80 conflict. See here how to resolve the XAMPP Apache port conflict and run IIS and Apache run on the same computer.
In this scenario, after making changes to the httpd.conf, you need to access localhost using the port number you configured for Apache in Apache’s httpd.conf file. For example, if port 8080 was configured for Apache, then access localhost using the URL “http://localhost:8080” from your web browser.
- Click on “phpmyadmin” at the bottom of the on the left hand side.
- Login to phpMyAdmin using the MySQL login and password.
(Regarding phpMyAdmin password, see here) - In phpMyAdmin, create a new database for WordPress –name the database, say “wordpress”.
- Now open Windows Explorer and navigate to “c:/xampp/htdocs” (or wherever you had installed XAMPP)
- Create a new folder say “wordpress” under the “c:/xampp/htdocs” directory.
- Extract the WordPress downloaded and copy the contents and paste to the location “c:/xampp/htdocs/wordpress.”
- Rename the file wp-config-sample.php in the “c:/xampp/htdocs/wordpress.” to “wp-config.php”.
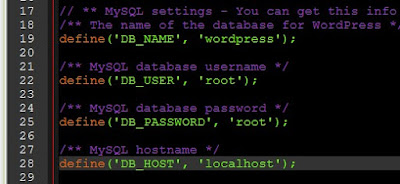
- Open “wp-config.php” in a notepad or any text editor.
- Now, in the file, search and edit the following lines as required.
/** The name of the database for WordPress */
define(‘DB_NAME’, ‘wordpress’);
//Replace with the name of the database you created from phpmyadmin earlier. I have entered “wordpress”./** MySQL database username */
define(‘DB_USER’, ‘database-username);
//Replace with database username. Default = root. If you created a separate DB user for the database “wordpress”, enter that here.
/** MySQL database password */
define(‘DB_PASSWORD’, ‘database-user-password’);
//Replace ‘database-user-password’ with database password. If you created a separate DB user for the database “wordpress”, enter the password for the DB user.
After this, we are ready to install WordPress.
- Open up a browser and go to “http://localhost/wordpress/wp-admin’” or using “http://localhost:8080….” if you had changed the Apache httpd.conf localhost port number.
- if everything is ok till here, just follow instructions to install WordPress.
- You will be asked to setup the site name, WordPress admin username and password.
- After the installation is complete, you will be asked to login to WordPress site.
- Once logged in you will be at WordPress Admin Dashboard.
- Install new themes, plugins and configure your new WordPress site.
Congrats you have successfully installed WordPress on Windows using XAMPP!
And happy blogging!
And happy blogging!


No comments